
Community of a Smith
Being a smith was not something that I expected to become or have such a ‘second home’ feeling in my life, but once I got started, I couldn’t stop. The world of smithing has had such an impact on my life in the sense that it is has brought me here today, to become an engineer. I started out learning how to make a blade, and continued into repose, ring and armor making, and creating leather accessories (such as coin bags). Smithing even brought me to rebuilding my first car, a 1998 Dodge Durango.
It takes a lot to be a smith, black smith referring to a smith that works with iron, particularly a traditional instead of modern. Traditional smithing, preindustrial era, requires long days spent standing over a hot forge, smoke in your eyes and lungs, sweat running down your face and back, and the never ending ‘ting’ of metal in your ears. The hardest part is a hard choice between designing a project for functionality, or the ache of sore, stiff and overworked muscles after spending three to eight hours moving metal by hand with a variety of weighted hammers. Personally, I find the latter to be more difficult.
People often misjudge how much work goes into doing something like a sword, a common thing that everyone wants to make. First you must learn how to stand and hammering techniques. You then need to hone those skills on creating objects that don't seem to have anything to do with a blade (such as gate handles and nails) which actually train your muscle memory so that you can create more complicated objects. A sword usually takes about one year to create (from scrap to blade) for a smith who has been trained in stance and hammering skills.
I truly love being a part of this community, and though yes it can be a difficult field and involves a lot of hard work, I do not want to discourage anyone from becoming a part of this community. There is nothing quite like the feeling of finally achieving what you imagined when you gathered your materials after working like a dog often for months, it is breath taking, prideful, and you begin to treasure your work because you earned it.
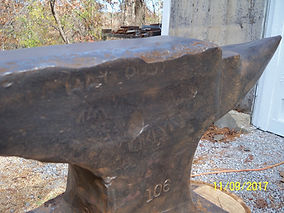
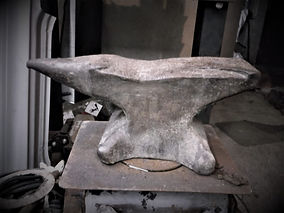
The two anvils above are too warped and cracked to be used, whereas the one below is ready for action.

The Eight Levels of Traditional Smithing
1. Nail Maker
2. Farrier (horse shoe maker)
3. Kitchen ware- i.e. pots and pans
4. Knives
5. Hardware- i.e. hinges
6. Decorative- i.e. cast iron gates
7. Armor
8. Weapons
Different types of smiths
"Smith" means to manipulate or make
Red Smith- Copper
Black smith- Iron and Steel
Bronze smith
Gold and Silver Smith
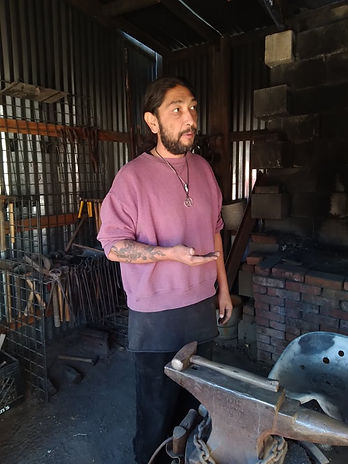
I met Michael Ortega at a renaissance recreation community teaching a lesson on Japanese weaving. We quickly became friends and me being an inquisitive person naturally became one of his students. MO is a master smith who was trained in around the world by multiple Master Smiths and is skilled in all eight levels of blacksmithing, with a specialty in armor through out the ages. I have attended multiple events with him, such as Drygystan, Outlandish, and Renaissance Faire, as his ‘squire’.
My main purpose at these events was to assist him in getting in and out of his armor before and after combat, and to learn the terminology as well as placement of the armor itself. He is a brilliant teacher and the lessons he teaches me in blacksmithing often translate to modern life, one lesson I use daily is “be aware of your surroundings”. You never know what could happen, and it is best to always be paying attention just in case.
When starting a project you want to make sure all of your tools and materials are with you before you start, it's a waste of coal to have to go get something while in the shop, and god forbid you leave your piece to melt while you are away. Once supplies are ready, you light your forge using the coke (old coals) from the previous fire. You will place your scrap metal that you are shaping into the fire and occasionally rotate to get an even heat, placing the metal in a way that targets the heat to where you are going to be working. "...blacksmithing involves mastering and becoming comfortable with a core of basic concepts and techniques through repeated practice and honing of skills, this manual is designed to provide participants with exposure to and practice in those basic concepts. The first technical session is designed to provide an overview of the major concepts involved and lay the groundwork for the remainder of the program" (Watson, Pete. Basic Techniques of Blacksmithing : A Manual for Trainers. The Center, 1982).
According to the Basic Techniques of Blacksmithing : A Manual for Trainers. The Center, 1982, by Watson and Pete, in order for participants to have the opportunity to practice basic blacksmithing skills for a class of 12, it will be necessary to set up a minimum of six (preferably seven) complete forge stations. Ideally, this will require approximately:
-
7 forges and bellows or blowers
-
5 anvils and stands or stumps
-
l swage block (or equivalent) "Swed-ge block"
-
3 mounted vices
-
3 grinders (motorized, 7 electrical if possible)
-
7 (l,500 gr.) 3-lb. cross-or 3 straight- peen hammers
-
7 (2,000 gr.) 4-lb. cross-or 7 straight-peen hammers
-
7 l0-lb. cross-or straight-peen hammers
-
7 pairs large vice grips
-
7 pairs flat tongs
-
7 prs. round or V-nose tongs (l/2" - 5/8")
-
7 prs. pick-up tongs (3/8")
-
7 hot cuts
-
7 cold cuts
-
3 hack saws with 6 extra blades (l8 teeth per inch)
-
7 5-gal. quench buckets quench buckets + lids (filled with recycled motor oil)
-
7 pieces of abrasive stone (e.g., carborundum)
If you are smithing by yourself though only one of each (excluding the extra blades) is necessary, and you do not require tools to be motorized. Having motorized tools can greatly speed up the process, though continue with caution because it much easier to damage or 'remove to much' with the aid of motorized tools. If you are going to use power tools, remember to stop frequently to check your work.
A swage block (or swager block) is a large, heavy block of cast iron or steel used in smithing, with variously-sized holes in its face and usually with forms on the sides. The through-holes are of various shapes and sizes and are used to hold, support or back up a hot bar of metal for further shaping. (wiki)

Mounted floor vice
Some other things listed by the Basic Techniques of Blacksmithing : A Manual for Trainers. The Center, 1982, by Watson and Pete, which I find are not necessary to have so many, but the more the merrier.
-
7 files
-
60' of V' round bar or rebar
-
fuel to supply forges
-
40' of 3/8" round bar or rebar for five days
-
50' of 5/8" round bar or rebar
-
4 hand-held wire brushes
-
a collection of miscellaneous scrap steel
-
supply of flux and brass
-
variety of leaf springs
-
several axles
-
assorted coil springs
-
bricks
"This approach to training is based on the principles of non- formal education, and is designed to strike a balance between structured learning and independent discovery" (Watson, Pete. Basic Techniques of Blacksmithing : A Manual for Trainers. The Center, 1982).
Bibliography
MO Master Smith and Teacher
https://en.wikipedia.org/wiki/Swage_block
Watson, Pete. Basic Techniques of Blacksmithing : A Manual for Trainers. The Center, 1982.
Music: https://www.youtube.com/watch?v=lpQ5mBabLtU , Mike in the shop
"Shut up Meg" -SA
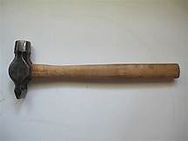

"A straight pein is a "blade" that is parallel to the handle. The straight pein can be sharp, rounded, flat, smooth or textured. A straight pein hammer can be used in metal work, stone work, blacksmithing or woodworking. A staight pein is parallel to the handle." (hammer source)

Flat tongs


Round Tongs
Discourse Community Project Reflection
This project was a difficult task. Finding the time to interview someone from the community while also maintaining a life that involves work, school, and ‘adulting’. Between my schedule and my interviewees, we had a very limited about of time that would work for the interview itself. We made it work, though it was not without difficulty. I worked on getting as much as I could set up in the meantime, and our first window had to be rescheduled, with only on window of time to do the interview we did not waste time when it came around. Once recorded the editing process began, choosing which parts of the interview to use was filled with hard choices due to the time restrictions. The need to shorten material made certain parts came out choppy and had to be revised later in the editing process. Once revised everything fell into place. I used the same software as before, Premiere Pro, and I must put note that I am a big fan of its transitioning ability. All in all, I felt very pressed for time with a lot to cover, but that it came together nicely despite the crunch. As far as revisions go, I had some issues with making the video the right length and my solution was to pick what I felt was going to be the best choices, though it took time to try to blend the cuts into the video and make it smooth.